ui5con2022-p13n-ws
Engine Registration for Table
Having established the custom control, you can start adding personalization capabilities by making use of the sap.m.p13n.Engine.
Load the Dependencies
Require the dependencies in P13nTable.js. Add the following modules and their imports:
sap.ui.define([
    "sap/m/Table",
    "sap/m/p13n/Engine",
    "sap/m/p13n/SelectionController",
    "sap/m/p13n/MetadataHelper",
    "sap/m/p13n/modification/ModificationHandler"
], function (
    Table, Engine, SelectionController, MetadataHelper, ModificationHandler
) {
    "use strict";
Required Modules
sap.m.p13n.Engine: The central artifact and API for application/control development. Since the Engine is a static artifact, you need to ensure that control instances are registered to it.sap.m.p13n.SelectionController: A basic controller that allows to manage the state of control aggregations. It detects changes like adding, removing and reordering the aggregation’s items. It also provides the UI for personalization.sap.m.p13n.MetadataHelper: Serves as an interface to fetch required metadata for the Controller, so that the dialog and the according selection can be performed properly.sap.m.p13n.modification.*ModificationHandler: Defines the persistency that is used by the Engine to store personalization changes.
Register the Table
Register the P13nTable to the Engine. Pass the control instance, the metadata provided via the helper, and the desired controllers. As the binding path should be part of the metadata you have to register to updateFinished event of the P13nTable. This way it is ensured that certain binding related information is available when needed.
var P13nTable = Table.extend("ui5con.p13nApp.control.P13nTable", {
    constructor: function () {
        Table.apply(this, arguments);

        //on updateFinished p13n can be initialized, the Promise is stored for later
        this._pInitialized = new Promise(function(resolve, reject){
            this.attachEventOnce("updateFinished", function() {
                this._initP13n();
                resolve();
            }, this);
        }.bind(this));
    },
    renderer: "sap.m.TableRenderer"
});
As next step add the _initP13n function to the P13nTable. This method should only be called once to initialize the personalization by registering the Table instance to the Engine using Engine#register. The SelectionController should manage the visibility and order of columns.
So that the Engine can work with the metadata, there is a MetadataHelper that supports you in providing the metadata in the required format and serves as an interface between Engine and your service metadata.
Note: The metadata passed to the helper needs to be serializable, as it might be stored in a persistence later. Furthermore you should not add personal or protected information, as it could be retrieved by anyone with access to the persistency.
The metadata should contain the following properties:
key: Used to identify the according item and by default associated with the corresponding control ID.label: Displayed in personalization popups to display the corresponding item.
The path is optional and contains the binding path for later usage. Very likely the metadata for your application is available in a different format, so this is just an example of how it can be done. You might need to do it differently in your productive scenario:
P13nTable.prototype._initP13n = function () {
    var aColumnsMetadata = [];

    this.getColumns().forEach(function (oColumn, iIndex) {
        aColumnsMetadata.push({
            key: oColumn.getId(),
            label: oColumn.getHeader().getText(),
            path: this.getItems()[0].getCells()[iIndex].getBinding("text").getPath()
        });
    }.bind(this))

    this.oHelper = new MetadataHelper(aColumnsMetadata)

    Engine.register(this, {
        helper: this.oHelper,
        modification: new ModificationHandler(),
        controller: {
            Columns: new SelectionController({
                control: this,
                targetAggregation: "columns"
            })
        }
    });
};
The Engine#register retrieves an object with configuration parameters as second argument:
helper: The helper defines which metadata is available, for example to allow displaying it in personalization Popups (e.g. the label).modification: Defines the desired persistency, which is for now the standard handler that does not persist any data. This implementation gets changed later in the workshop.controller: The registry of controllers with an arbitrary nameColumnsfor theSelectionControllerinstance. The name is up to the developer.
Note: The
columnsaggregation of the table is now managed by theSelectionController. This means there should be no alteration of thecolumnsaggregation via the usual API (e.g.addColumn,removeColumn…) as this would lead to conflicts with the internal mechanisms. Only that way the Engine can act as central management for state and persistence.
Open a Personalization Popup
The personalization dialog needs to be opened with via Engine#show. It requires passing the relevant parameters. Those are the registered Control, the required personalization panel and some configuration for the dialog to be displayed properly. To do that, add a function to the reusable P13nTable control:
P13nTable.prototype.openP13n = function (oEvent) {
    Engine.show(this, ["Columns"], {
        title: "Table Settings",
        source: oEvent.getSource()
    });
};
In this method call, the Engine opens a popup for the controller registered for key Columns earlier in the registration process. In addition, you can pass a custom title for the dialog and the button as source of the event.
Next, add a button in the Mountains.view.xml file as trigger. Also add a method onP13nPress in the Mountains.controller.js file:
<mvc:View
    height="100%"
    displayBlock="true"
    xmlns:mvc="sap.ui.core.mvc"
    xmlns="sap.m"
    xmlns:f="sap.f"
    xmlns:core="sap.ui.core"
    xmlns:ctl="ui5con.p13nApp.control"
    controllerName="ui5con.p13nApp.controller.Mountains">

	<f:DynamicPage id="dynamicPageId">
		<f:title>
			<f:DynamicPageTitle>
				<f:heading>
					<Title text="Mountain Filter Grid"/>
				</f:heading>

				<f:actions>
                    <Button id="p13nButton" icon="sap-icon://action-settings" type="Transparent" press=".onP13nPress"/>
				</f:actions>

			</f:DynamicPageTitle>
		</f:title>
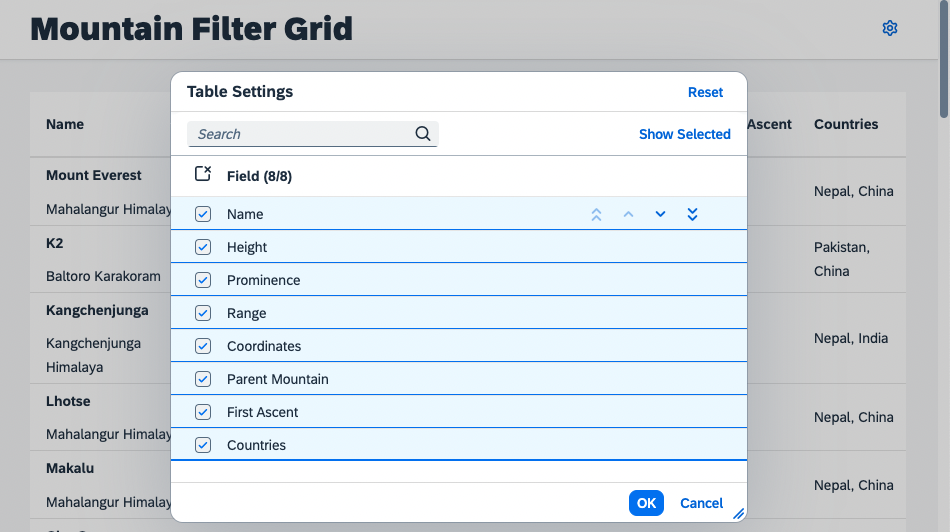
The application now has a settings icon in the upper right corner of the page.

Last but not least, add the according controller code to trigger the execution of the P13nTable#openP13n method in the Mountains.controller.js file:
onP13nPress: function(oEvent) {
    this.byId("table").openP13n(oEvent);
}
Once this step has been completed, you can press the settings icon and see that the Engine displays the personalization Popup with the labels defined durning the registration process using the MetadataHelper.

As you might have noticed, the selection state is already maintained properly by using the SelectionController. But since you did not yet implement any handling for the selections in the UI, the table does not change its columns visibility and ordering yet.
Summary
You got to know the required modules for enhancing your table with personalization features. You registered it to the according controller, so that now a UI comes up. Exercise 4 shows, how to add the relevant handling for the columns selection.